
It is Plugin that makes Vim colorful and easy to use. In this post I record my way of learning to use vim plugins managers.
Which one?
When I search the vim plugins manager on google, I found there are many good plugins managers. Here is the rank of “The best plugin managers for vim“ on Slant
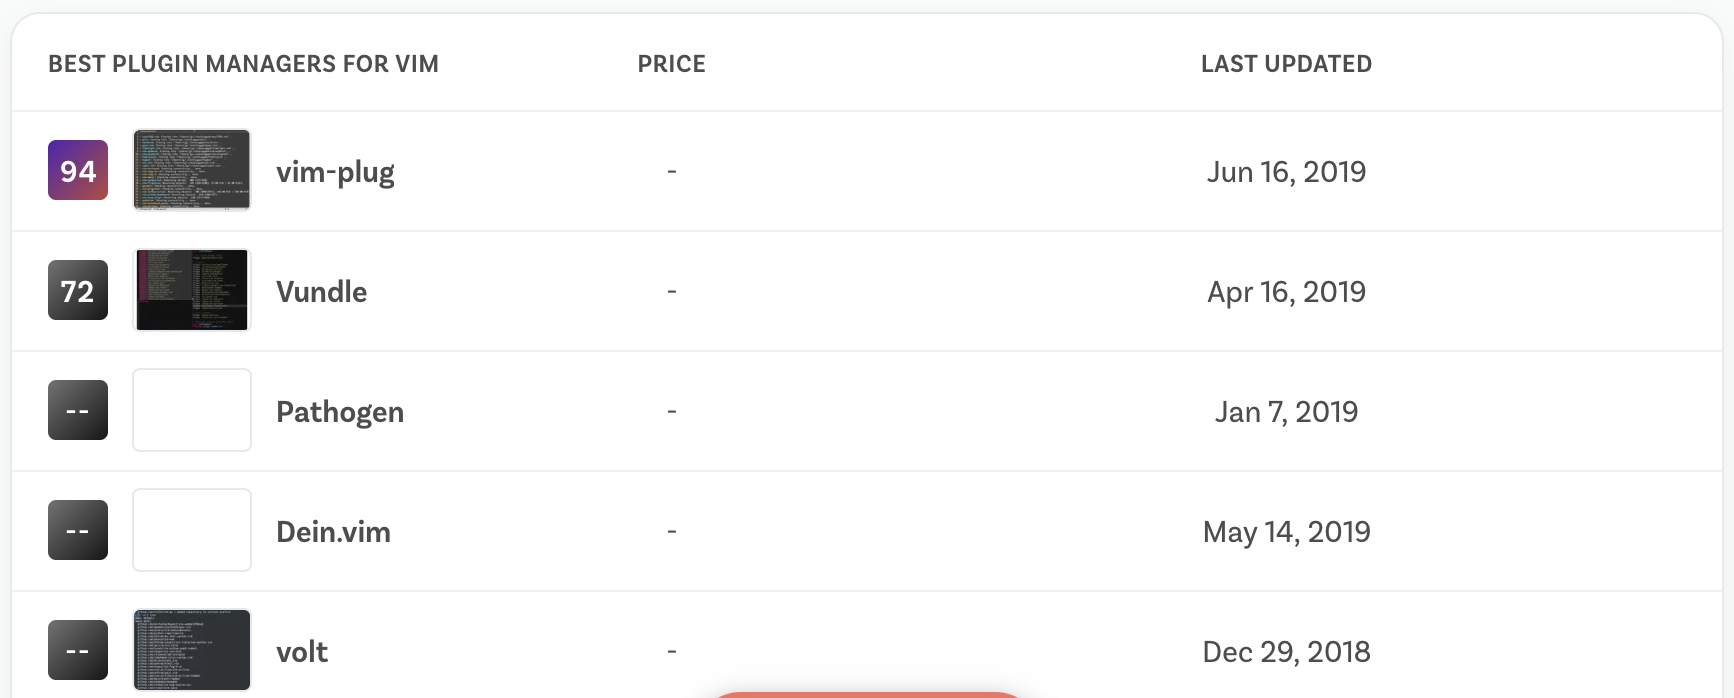
I saw several wonderful vim plugin managers such as vim-plug, Vundle, Pathogen, Dein.vim and so on. They both have pros and cons, and after some investigation I finally decide to use vim-plug.
Here are some information about these plugin managers.
- Vim-plug
Pros:
- Really light
- Parallel plugin installation makes it really fast
- On-demand loading for faster startup time
- Vundle
Pros:
- Easy to use
- Can find, install, update plugins automatically
Cons:
- Old
- Vimrc can get noisy
- Slower if compared to vim-plug
- Pathogen
Pros:
- Minimal additions to .vimrc file
- More control over your plugins
Cons:
- More manual work
- Dein.vim
Pros:
- Fast
Cons:
- Complex to set up/ understand
- Limited documentation
And here is an article about vim plugins and startup time. The author conclude that
By not loading plugins that are not immediately needed, NeoBundle and vim-plug both managed to reduce the startup times by around 107ms. vim-plug now takes only 135ms to start.

Use vim-plug to manage plugins
The rest part are summaries for README on vim-plug github site.
Install
In Mac, it is really simple
$ curl -fLo ~/.vim/autoload/plug.vim --create-dirs \

https://raw.githubusercontent.com/junegunn/vim-plug/master/plug.vim
This command will download plug.vim and put it in the “$HOME/.vim/autoload” directory.
Usage Pipeline
The usage is really straightforward and simple. There are basically three steps.
Write
Plug 'GitHub_postfix_of_the_plugin'in the.vimrcfile between the linecall plug#begin('~/.vim/plugged')and the linecall plug#end(). For more options, see “Plug options” section.$ source ~/.vimrcor in vim run:source %to make the.vimrcworks.In vim, run
:PlugInstall. It will open a new window and run things like these

For example,
I want to install vim-startify.
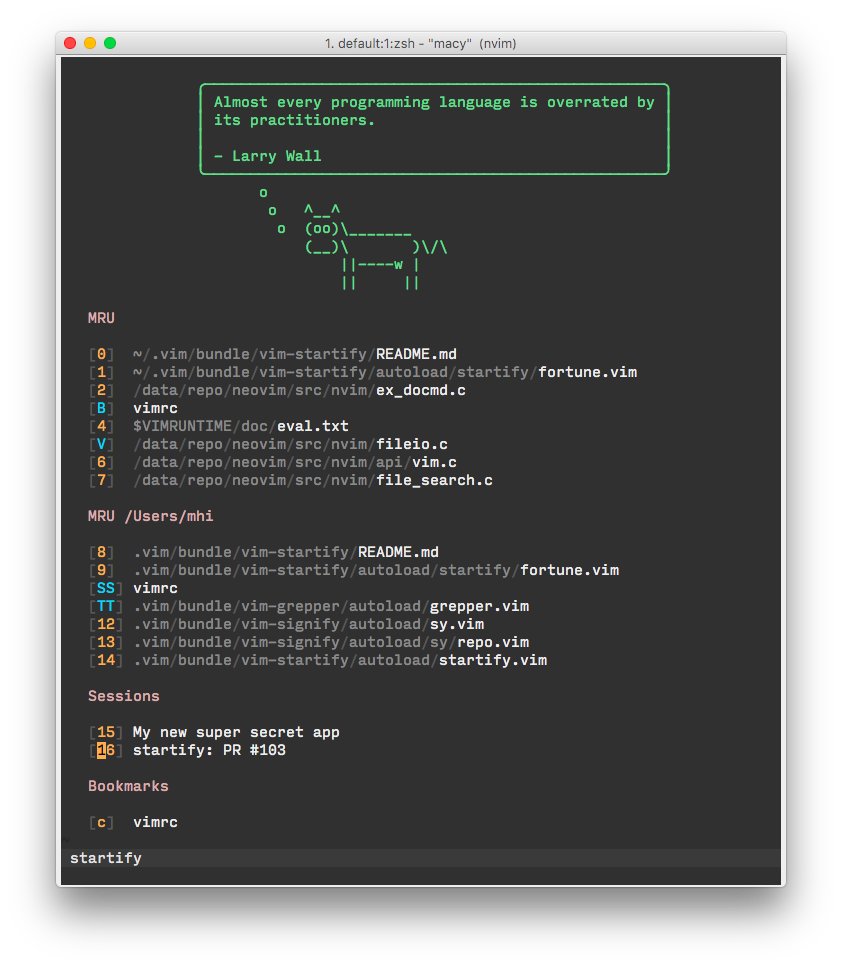
Once you have installed it, when you run $vim in your command line, it will show a page looks like this,
 .
.
As the github site says:
It provides dynamically created headers or footers and uses configurable lists to show recently used or bookmarked files and persistent sessions. All of this can be accessed in a simple to use menu that even allows to open multiple entries at once.
For example, you can just type 0 and vim will open the corresponding file appears in the list. In the picture, it will open ~/.vim/bundle/vim-startify/README.md.
First go to the GitHub site of vim stratify, we can see the URL is <https://github.com/mhinz/vim-startify> so copy the postfix of URL “mhinz/vim-startify” to .vimrc file. Now the .vimrc looks like this
" Specify a directory for plugins
" - For Neovim: ~/.local/share/nvim/plugged
" - Avoid using standard Vim directory names like 'plugin'
call plug#begin('~/.vim/plugged')

" vim startify
Plug 'mhinz/vim-startify'

" Initialize plugin system
call plug#end()
Then in vim, run :source % to make it work.
At last, in vim, run :PlugInstall to install the plugin.
Plug options
There are also some options you can choose when you install the plugins. Just put the options behind the Plug 'GitHub_postfix_of_the_plugin'
For example, for nerdtree plugin, you can use on-demanding loading for faster startup time.
" On-demand loading
Plug 'scrooloose/nerdtree', { 'on':  'NERDTreeToggle' }
NERD tree will be loaded on the first invocation of NERDTreeToggle command.
Or the plugin in inside the subdirectory of GitHub repo. You can use rtp to specify the subdirectory that contains vim plugin. For example, I want a color scheme and it is a colorscheme for many programs, so to specify the vim plugin, I use
Plug 'sonph/onehalf', {'rtp': 'vim/'}
It means the corresponding vim plugin is in the “vim/” directory.
There are some plugins that require extra steps after installation or update. In that case, use do option to describe the task to be performed.
Plug 'Shougo/vimproc.vim', { 'do': 'make' }
Plug 'Valloric/YouCompleteMe', { 'do': './install.py' }
If the value starts with :, it will be recognized as a Vim command.
Plug 'fatih/vim-go', { 'do': ':GoInstallBinaries' }
| Option | Description |
|---|---|
branch/tag/commit |
Branch/tag/commit of the repository to use |
rtp |
Subdirectory that contains Vim plugin |
dir |
Custom directory for the plugin |
as |
Use different name for the plugin |
do |
Post-update hook (string or funcref) |
on |
On-demand loading: Commands or <Plug>-mappings |
for |
On-demand loading: File types |
frozen |
Do not update unless explicitly specified |
Commands
There are some commands for vim-plug, I just copy it from the GitHub site.
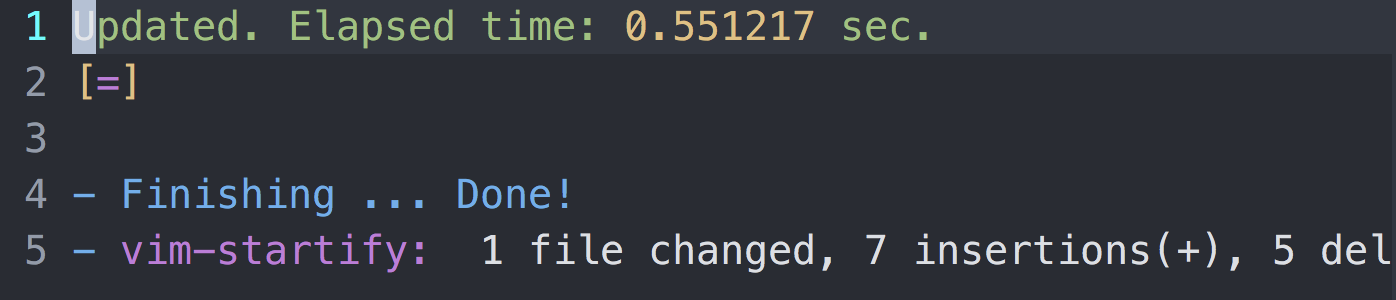
For example, if you want to update vim-startify, in vim, type :PlugUpdate vim-startify Then it looks like this
| Command | Description |
|---|---|
PlugInstall [name ...] [#threads] |
Install plugins |
PlugUpdate [name ...] [#threads] |
Install or update plugins |
PlugClean[!] |
Remove unused directories (bang version will clean without prompt) |
PlugUpgrade |
Upgrade vim-plug itself |
PlugStatus |
Check the status of plugins |
PlugDiff |
Examine changes from the previous update and the pending changes |
PlugSnapshot[!] [output path] |
Generate script for restoring the current snapshot of the plugins |